If you bought a VPS and you are now running your website, maybe you want also to install a new self-hosted web service like a cloud server to store your data.
For example, you would like to run Nextcloud but actually you don’t know how to setup the environment and how to be able to access Nextcloud from the outside world. I hope you will learn something new in this short guide.
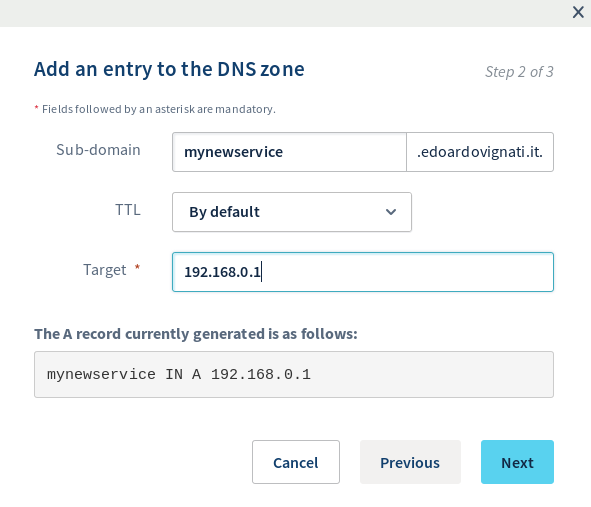
First of all you have to know that we are going to setup a third level domain for your service. You will access the service in this way “mynewservice.mydomain.com”. To do so, we have to setup a new A record in the DNS zone in your hosting administration panel. For example, if you are running on OVH, you can find the DNS zone under “Web > Domains > ‘mydomain’ > DNS Zone”. Inside this zone, you have to create a new A record (“Add an entry” button) pointing your new subdomain (mynewservice.mydomain.com) to your IPV4 (or an AAAA record if you have an IPV6).
Here is an example:

After a while, the new subdomain will be spread over the internet and you will be able to access it. At this moment we only created a redirection to your VPS. If you visit the brand new subdomain you will probably get an error or you will be redirected to a default page of Apache.
Now let’s continue to setup your new service. Next step is to install your service on your VPS. You can find an interesting list of self-hosted software here. After the installation of the new service, you should have on your vps a public folder where the new service is running, for example /home/myuser/publicservice/, depending on the specific installation of the new application.
We have now to link the new service with the subdomain that we have previously created. In this way you can access the functionalities of the service from the outside. To achieve this goal we need the help of the webserver (Apache in this case). Here below you can easily see how the webserver is going to work.

We are now going to tell Apache how to serve the requests from our new subdomain with the content of the /path/to/new/service.
The Apache configuration folder is usually at /etc/apache2. Jump inside this folder:
$ cd /etc/apache2/sites-availableEach public service in your VPS has to be served by a VirtualHost
Let’s create a new virtual host for the new service. First of all create a new configuration.
$ sudo vim mynewservice.mydomain.com.confCopy and edit the following snippet:
<IfModule mod_rewrite.c>
RewriteEngine on
RewriteRule ^/$ / [R]
</IfModule>

<IfModule mod_ssl.c>
<VirtualHost *:80>
ServerName mynewservice.mydomain.com
DocumentRoot /absolute/path/to/service
Redirect permanent / https://mynewservice.mydomain.com/
</VirtualHost>
<VirtualHost *:443>
	ServerAdmin admin@localhost

	DocumentRoot /absolute/path/to/service
	ErrorLog ${APACHE_LOG_DIR}/error.log
	CustomLog ${APACHE_LOG_DIR}/access.log combined
	ServerName mynewservice.mydomain.com
	ServerAlias mynewservice.mydomain.com
	AccessFileName .htaccess

	<Directory /absolute/path/to/service>
	Options FollowSymLinks
	AllowOverride All
	Order allow,deny
	allow from all
	</Directory>

	Include /etc/letsencrypt/options-ssl-apache.conf
	SSLCertificateFile /etc/letsencrypt/live/mynewservice.mydomain.com/fullchain.pem
	SSLCertificateKeyFile /etc/letsencrypt/live/mynewservice.mydomain.com/privkey.pem
</VirtualHost>
</IfModule>
The snippet above:
- will redirect all the requests from HTTP (port 80) to HTTPS (port 443)
- declares what is the path on your VPS to the public homepage of your service
- defines the third-level domain that is going to serve (the one we created in the DNS zone)
- sets some additional configuration
- indicates where Apache can find the SSL certificates
If you do not have a public directory but your service is running on a specific port, you can use another Virtual Host configuration, the Proxy. The Proxy Virtual Host allow you to redirect the requests between the service and the outside world.
First of all enable the mods:
sudo a2enmod ssl
sudo a2enmod proxy
sudo a2enmod proxy_http
sudo a2enmod headers
sudo a2enmod rewrite
Use this command to check the httpd daemon:
$ sudo apachectl -SHere below an example:
<IfModule mod_rewrite.c>
	RewriteEngine on
	RewriteRule ^/$ / [R]
</IfModule>

<IfModule mod_ssl.c>
	<VirtualHost *:80>
		ServerName myservice.mydomain.it
		Redirect permanent / https://myservice.mydomain.it/
	</VirtualHost>
	<VirtualHost *:443>
		ErrorLog ${APACHE_LOG_DIR}/error.log
		CustomLog ${APACHE_LOG_DIR}/access.log combined
       		ServerName myservice.mydomain.it
	       	ServerAlias myservice.mydomain.it


    		ProxyPreserveHost On
    		ProxyPass / http://localhost:MY_PORT/
    		ProxyPassReverse / http://localhost:MY_PORT/

		Include /etc/letsencrypt/options-ssl-apache.conf
		SSLCertificateFile /etc/letsencrypt/live/mydomain.it/fullchain.pem
		SSLCertificateKeyFile /etc/letsencrypt/live/mydomain.it/privkey.pem
	</VirtualHost>
</IfModule>
You have to pen MY_PORT only if you are not going to use a proxy such as the above:
$ sudo vim /etc/apache2/ports.confAdd like this:
Listen <MY_PORT>In any case, enable the configuration of the new VirtualHost and restart Apache:
$ sudo a2ensite mynewservice.mydomain.com.conf
$ sudo systemctl restart apache2
The a2ensite command enables a new VirtualHost creating a soft link inside the /etc/apache2/sites-enebled folder. Use instead the a2dissite command (more options here) if you want to disable a VirtualHost:
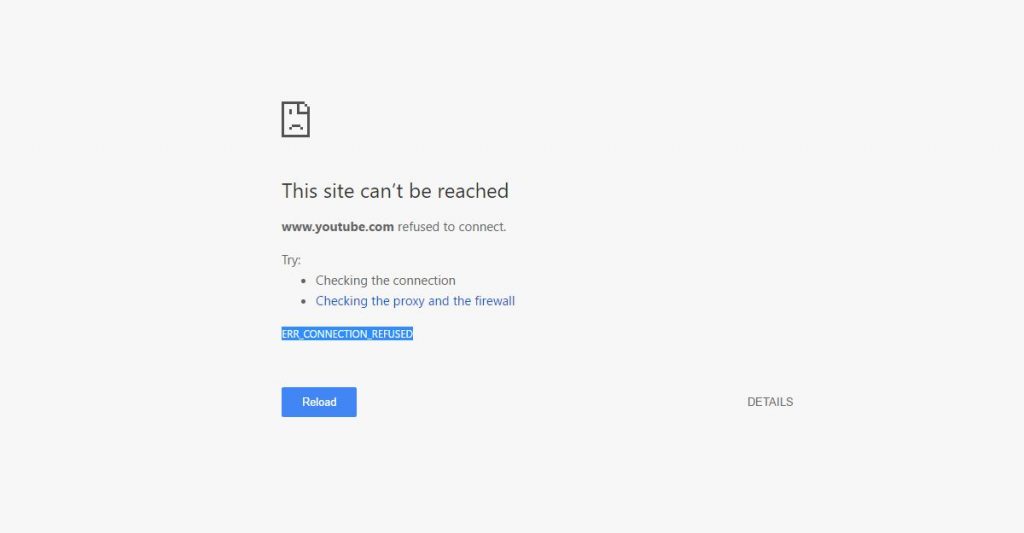
$ sudo a2dissite mynewservice.mydomain.com.confLast thing to do is to generate an SSL certificate (we used the port 443 with the mod_ssl in the previous configuration that allows Apache to speak through HTTPS) for this new subdomain or you will get an error page like this one:

A very easy way to get a certificate in order to obtain your green padlock ![]() is to use Let’s Encrypt (a free, automated, and open Certificate Authority) and, in particular, use CertBot. So simply go here, choose Apache (or your web server) and the operating system of your VPS and follow the instructions.
is to use Let’s Encrypt (a free, automated, and open Certificate Authority) and, in particular, use CertBot. So simply go here, choose Apache (or your web server) and the operating system of your VPS and follow the instructions.
If you want to generate a certificate for all subdomains via DNS you can run this command (replace ./certbot-auto with certbot if you installed it with apt-get for example):
$ sudo ./certbot-auto certonly --manual --preferred-challenges=dns --server https://acme-v02.api.letsencrypt.org/directory --agree-tosand follow the wizard. When asking the domains please note to type your domain and also the wildcard.

Note that in this command you are requesting two types of certificates for two different types of domain (-d option): one for the wildcard (all the third level domains) and another one for your main domain.
This means that the wildcard certificate will not be valid if your webserver is serving the website as https://mydomain.tld instead of https://myservice.mydomain.tld.
..or you can use the Apache plugin wizard simply running for non wildcard certificates:
$ sudo ./certbot-auto --apacheAn email will be sent when the certificate is close to the expiration date.
To manually renew non wildcard certificates run the command:
$ sudo ./certbot-auto certonlyand follow the wizard. Otherwise if you want to renew automatically (ex. in a cronjob) you can simulate a renewal with the following command:
$ sudo ~/certbot-auto renew --dry-runand if it succeed you can create a cronjob (awesome crontab creator here) in the following way (at 12:00 on Sunday):
$ crontab -e
> 00 12 * * 0 ~/certbot-auto renew
Note that “renew” isn’t an interactive command.
To list all the certificates:
$ sudo ./certbot-auto certificatesYou can also install a 4th level domain certificate usgin “./certbot-auto certonly” requesting a wildcard certificate for a specific 3rd level domain, for example:
*.mysubdomain.mydomain.tldIn this case you will have to edit the Let’s Encrypt path in your virtual host in apache. For example:
SSLCertificateFile /etc/letsencrypt/live/mysubdomain.mydomain.com/fullchain.pemThe entire process requires commitment and time if you are trying this for the first time. Next time will be easier. The steps will be the same:
- Create a subdomain pointing to your IP address (or CNAME) in your DNS dashboard
- Install the application you want
- Create a VirtualHost redirecting the traffic to the new application public folder
- Enable SSL on the new subdomain
I hope I helped you to deploy a new web application.

 This work is licensed under a
Creative Commons Attribution-NonCommercial 4.0 International License.
